Wednesday 3 June 2015

WEEK 10 - DAY 4 - FINAL

WEEK 10 - DAY 4 - FINAL

Access the shared photography folder for an example of the slide show you need to produce, the final result of what you need to produce looks like this:


WEEK 10 - DAY 3 - FINAL

WEEK 10 - DAY 3 - FINAL

Access the shared photography folder for an example of the slide show you need to produce, the final result of what you need to produce looks like this:


Tuesday 2 June 2015

WEEK 10 - DAY 2 - FINAL

WEEK 10 - DAY 2 - FINAL

Access the shared photography folder for an example of the slide show you need to produce, the final result of what you need to produce looks like this:


Monday 1 June 2015

WEEK 10 - DAY 1 - FINAL

WEEK 10 - DAY 1 - FINAL

Access the shared photography file for an example of the slide show you need to produce, the final result of what you need to produce looks like this:


Thursday 28 May 2015

WEEK 9 DAY 4 - SURREAL CIRCUS

WEEK 9 DAY 4 - SURREAL CIRCUS

Your final weeks surreal assignment is to use the following skills to create the image below:
- using the LASSO TOOL clip around the animal in your image,
- press CNTL C to copy and CNTL V to paste, this will create a new layer with just your clipped animal
- use the LASSO TOOL to remove the background
- insert a circus theme background
- copy the animal at least 4 times
- re-colour each copy

Original

Photoshopped for this assignment


Tuesday 26 May 2015

WEEK 9 - DAY 3 - Surreal continued ...

WEEK 9 - DAY 3 - Surreal continued ...

SAMPLE 2 - ADDING TEXTURE

STEP 1: Select and image from Friday's shoot preferably one with the fountain in the centre.

STEP 2:Incorporate an image of a manufactured object into the photo. Drag the layer into your selected image and clip out background, you will need to use the POLYGONAL LASSO TOOL to clip around the edges or you. Then remove the background behind the fountain.

STEP 2: Do an Internet search and select 2 texture images and one sky image. Drag the layers into your fountain image. Use the MAGIC WAND TOOL and the SELECT-INVERSE to remove a section of the fountain so that the texture is showing through. Do the same with the plastic animal in the photo.

STEP 3: Add the sky layer as your new background layer, modify colour if necessary.


Sample


WEEK 9 - DAY 2 - SURREAL continued...

WEEK 9 - DAY 2 - SURREAL continued...

we are going to continue with the surreal project, sample

SAMPLE 1 - ADDING YOU
STEP 1: Select and image from Friday's shoot and incorporate an image of you (an existing or take an image) into the photo. Drag the layer into your selected image and clip out background, you will need to use the POLYGONAL LASSO TOOL to clip around the edges or you.
STEP 2: Use the SMART BRUSH TOOL to change the colours of objects in the image to look unrealistic.
STEP 3: Add a natural element to your image to increase the surreal feel of your image.


Monday 25 May 2015

WEEK 9 - DAY 1 - SURREAL PHOTOGRAPHY

WEEK 9 - DAY 1 - SURREAL PHOTOGRAPHY

In one of the first lessons in this course we listened to a Eric Johansson speak about his process for photographing his surreal images. This week we are going to use the photos taken Friday to create our own surreal imagery.

Image by Eric Johansson

Image by Caras Ionut


On Friday's photo shoot we used props to incorporate objects into a photograph playing with proportion and scale. Some examples are shown below:


 ACTIVITY 1:
Using the Photoshop skills you have gained, you are going to add objects, or a person, into the friday's images to create a surreal landscape.

An example and demonstration will be given in class today.

SAMPLE 1 - ADDING YOU
STEP 1: Select and image from Friday's shoot and incorporate an image of you (an existing or take an image) into the photo. Drag the layer into your selected image and clip out background, you will need to use the POLYGONAL LASSO TOOL to clip around the edges or you.
STEP 2: Use the SMART BRUSH TOOL to change the colours of objects in the image to look unrealistic.
STEP 3: Add a natural element to your image to increase the surreal feel of your image.

Thursday 21 May 2015

WEEK 8 - DAY 4 - Photographic Compositions Photoshoot

WEEK 8 - DAY 4 - Photographic Compositions Photoshoot

Today we will be meeting outside room 4 to take a short walk to a few sites to practice taking photos using the 5 photographic composition elements discussed in yesterdays class.

·         rule of thirds
·         rule for placing the horizon line
·         rule for leaning into the action
·         rule for following the lines of the image
·         rule for pattern and texture

WEEK 8 - DAY 3 - PHOTOGRAPHIC COMPOSITION


WEEK 8 - DAY 3 - PHOTOGRAPHIC COMPOSITION

There are essentially two parts to taking a great photo, the first being selecting a great subject and the second are how your subject is framed in the image. The 5 basic rules of photographic composition are:

·         rule of thirds
·         rule for placing the horizon line
·         rule for leaning into the action
·         rule for following the lines of the image
·         rule for pattern and texture

Click the following link to see examples:

http://www.nikonusa.com/en/Learn-And-Explore/Article/h7dfrceh/5-easy-composition-guidelines.html

ACTIVITY 1:

Step 1: Using the 5 basic rules of photography, go to Getty images and select at least 2 images that represent each rule of photography.


Step 2: Create a 6 page Google slideshow with a title page and 10 images you selected, each subsequent page displaying the 5 rules of composition. See sample in Google drive shared class folder.

Wednesday 20 May 2015

WEEK 8 - DAY 2 - continue working on portraits...

WEEK 8 - DAY 2 - continue working on portraits...

WEEK 8 - DAY 1 - Classics Continued

WEEK 8 - DAY 1 - Classics Continued

Continue working on your 3 classics

WEEK 7 - DAY 5 - work period

WEEK 7 - DAY 5

Work period today in computer lab

WEEK 7 - DAY 4 - CLASSIC PORTRAITS cont...

WEEK 7 - DAY 4 - CLASSIC PORTRAITS cont...

You will continue working on your 3 classic portraits.

Additional Photoshop demonstration on how to make skin tone will be given in class.

Wednesday 13 May 2015

WEEK 7 - DAY 3 - CLASSICS PORTRAITS PHOTOSHOPPED

WEEK 7 - DAY 3 - CLASSICS PORTRAITS PHOTOSHOPPED

To finish this unit on portraits we are going to listen to a Russian photographer Uldus Bakhtiozina and the work she is doing to change stereotypes using her photographs.


ASSIGNMENT 1: 

In the next assignment you are going to use classic Baroque, Victorian or Renaissance portraits and photoshop them to include your face.   


STEP 1:
Select at least 3 classic painting portraits from the Baroque, Victorian or Renaissance era to use as your base.

STEP 2:
Take photos to duplicate portraits of the light, shadow and angles of the image you want to photoshop.


Tuesday 12 May 2015

WEEK 7 - DAY 2 - MID-TERM

WEEK 7 - DAY 2 - MID-TERM

...continue working on the mid-term assignment


Monday 11 May 2015

WEEK 7 - DAY 1

WEEK 7 - DAY 1 - MIDTERM

The midterm assignment for this course involves creating the following using your portrait.


- download portrait, leaf and line drawing of vine
- open both in Photoshop
- drag line drawing into portrait file
- on line drawing layer - remove background
- on line drawing layer - CNTRL select to select outline of image, EDIT - FILL SELECTION - PATTERN
- on portrait layer remove background

Thursday 7 May 2015

WEEK 6 - DAY 4 - Graffiti and Portraits

WEEK 6 - DAY 4 - Graffiti and Portraits

A French artist by the name of JR has incorporated portraits and graffiti into an art project in the attempts to change perceptions. Watch the following Ted Talks.


Answer the following questions:

1. Why do you think JR choose to depict the street gang members and the Israeli and Palestinian workers with goofy face poses?

2. In the slums of Kenya and Brazil why do think JR chose women as his subject?

ACTIVITY 1 - WEEK 6 - CULMINATING TASK - 3 TIMES ME

STEP 1: Take 3 self images with posed faces, all 3 using different perspectives (angles), when taking the photos keep in mind the message you included on day 1 slide - I AM A PERSON WHO...

STEP 2: Upload the 3 images to your laptop and open in Photoshop Element.

STEP 3: Using the skills and tools you learned this week HEALING TOOL (use PATTERN and SAMPLE), BRUSH and ELLIPTICAL MARQUEE create an image incorporating the 3 funny face images. All 3 images must be present in one photoshop file. See sample on Photography Folder.

STEP 4: Create a new slide show and include the 3 original photos on one slide and the 3, include the I AM A PERSON WHO message on your slide.

Wednesday 6 May 2015

WEEK 6 - DAY 3 - SMOOTH THE SKIN

WEEK 6 - DAY 3 - SMOOTH THE SKIN

use brush tool to modify graffiti background

use healing brush tool to even out skin tone
Today we are going to learn about the BRUSH TOOL and the HEALING TOOL. Using the self images we took yesterday we are going to smooth the skin, plump and colour the lips and smooth the graffiti brick background.

ACTIVITY 1 - SMOOTH AND PLUMP

STEP 1: Take few photos of yourself, or use yesterdays original image. Download your images to your laptop hard drive.

STEP 2: Download the graffiti background you want to incorporate into your photo.

STEP 3: Open your background graffiti and self image in Photoshop and make each image a layer.

STEP 4: Open and drag your self image layer into the graffiti image, adjust the size and positioning of your self layer.

STEP 5 - SMOOTH BRICK BACKGROUND: Using the BRUSH  TOOL and ALT key to select a colour with the eye dropper and smooth the brick pattern.

STEP 6 - SMOOTH THE SKIN: Using the HEALING TOOL STAMP tool touch up around the eyes and smooth out the skin to give it a consistent look.

STEP 7 - PLUMP THE LIPS: Using the CLONE STAMP TOOL  plump the lips.

STEP 8 - See sample in Photography folder.

Tuesday 5 May 2015

WEEK 6 - DAY 2 - SELFIE HEAD SHOT

WEEK 6 - DAY 2 - SELFIE HEAD SHOT

Today we are going to take some self images against a brick wall, remove part of the background, add the Friday graffiti shots as the new background and modify your eyes.

ACTIVITY 1 - Self Images

STEP 1: Take few photos of yourself, the background should be outside of the school against the brick wall. Download your images to your laptop hard drive.

STEP 2: Download the graffiti background you want to incorporate into your photo.

STEP 3: Open your background graffiti and self image in Photoshop and make each image a layer.

STEP 4: Open your drag your self image layer into the graffiti image, adjust the size and positioning of your self layer.

STEP 5: Using the ELLIPTICAL MARQUE  TOOL select one eye, press CNTL T to stretch and tilt the eye so that it resembles a cats eye. Do this to the other eye as well.

STEP 6: Using the CLONE STAMP tool touch up around the eyes and modify the eyebrows to match the slop of your new cat eyes.

STEP 7: Using the SMART BRUSH TOOL - PHOTOGRAPHIC - NEUTRAL B+W setting to remove the colour from your cat face layer.

STEP 8: SAVE FOR WEB and add to WEEK 6 slide show as shown in sample in PHOTOGRAPHY folder.

Monday 4 May 2015

WEEK 6 - DAY 1 - FACE SHOTS

WEEK 6 - DAY 1 - FACE SHOTS

In this world of media saturated face shots, the following Ted Talk speakers talk about how one copes with the camera when it is pointing at them. Click the following link to listen to what they have to say and answer the questions below:

How the camera reveals your baggage


List a few points about what the speaker refers to as your internal critic.


He talks about self acceptance, who we think we are v.s. who we feel we should be. Do you think this  is an inner conflict when a camera is pointed at you?


Does the camera reveal our self worth, he makes this point about being exposed. Do you agree?


The "surface to substance" remarks he makes, describe this in your own words (described as PsyPHOTOGRAPHY)

Can you describe a trajectory change in your life, how does it relate to your beliefs?


How would you answer this question "I am a person who?"


Do you feel a photograph can expose your true self?

ACTIVITY 1:

Based on the speaker in today's lesson, the 3 points were made about photographing the human face:

  • include one point about the talk you found interesting, it can be the answer to one of the questions or your own thoughts
  • include another point about the talk
  • complete the following statement:

I AM A PERSON WHO….

Thursday 30 April 2015

WEEK 5 DAY 4 - MODIFY and MERGE LAYERS with STOCK PHOTO IMAGES

WEEK 5 DAY 4 - MODIFY and MERGE LAYERS with STOCK PHOTO IMAGES

STEP 1: DOWNLOAD IMAGES
Go to Getty Images or some other stock image site and save to your hard drive 2 perspective images that you want to merge together, see sample in the AQW3M folder. oYou should have 2 new images saved in the Pictures Library on your laptop.

STEP 2: MERGE IMAGES
Open both saved stock photo images and using the MAGIC WAND, CLONE STAMP TOOL you will remove the background from one of the images and remove the watermark from the other.
Drag second image layer into the first image.
Take a screen snapshot of your image.

STEP 3: ADD TO SLIDE SHOW
Paste your modified stock image to a new slide of your WEEK 5.2 ADDITIONS
Title the slide CULMINATING TASK.

Wednesday 29 April 2015

WEEK 5 DAY 3 - ADD COMPONENTS TO AN IMAGE

WEEK 5 DAY 3 - ADD COMPONENTS TO AN IMAGE

STEP 1: DOWNLOAD IMAGES
Go to photography folded in shared google drive. Download skull image and one other image from Friday's photo shoot. You should have 2 new images saved in the Pictures Library on your laptop.

STEP 2: MERGE IMAGES
Open skull image and using the MAGIC WAND TOOL you will remove the blue background from the skull image.
Open your second image and drag the skull layer into this image.
Save for web in your picture library.

STEP 3: ADD TO SLIDE SHOW
Add your modified image to a new slide show called WEEK 5.2 ADDITIONS
Add your yesterdays modified Getty Image to the slide show.


Tuesday 28 April 2015

WEEK 5 - DAY 2 - Perspective Slide Show

Continue with yesterdays slide show and add one more slide with the following details:

NEW SLIDE:
- access GETTY IMAGES and select an image that represents one perspective, save image on hard drive
- open the Getty image in Photoshop and remove the trade mark

Sunday 26 April 2015

WEEK 5 - DAY 1 - Photographic Perspectives and Clone Stamping

WEEK 5 - DAY 1 - Photographic Perspectives and Clone Stamping

Using the images that were taken on Friday's photo shoot, perform the following activities.

LESSON:  An in class demonstration will be shown on how to use the clone stamp tool.


ACTIVITY 1: You are going to identify 4 different perspective images in the AWQ3M Week 5 folder.

STEP 1: Download your 4 chosen perspective images onto your laptop.

STEP 2: Create a slide show in your shared folder, include a title slide and your 4 perspective images, title each slide with the appropriate perspective descriptor.


ACTIVITY 2: You will be modifying your selected images using the clone stamping tool in Photoshop, you are going to remove at least 2 aspect of the each image.

STEP 1: Open your chosen image and using the MAGNIFIER, CLONE STAMP and POINTER tool you will be remove 2 aspects of your image.

STEP 2: Save your image using SAVE FOR WEB and upload it to your slide show on the appropriate slide. Include a description of what you removed on the slide.

EXEMPLAR: A sample of the slide show can be seen in AWQ3M folder.


Friday 24 April 2015

WEEK 4 - DAY 5 - Photo Shoot Perspectives

WEEK 4 - DAY 5 - Photo Shoot Perspectives

To prepare for next weeks lesson you will be taking photos using as many photographic perspectives as possible.

Once you are satisfied with your images you can upload them to your google drive.

Thursday 23 April 2015

WEEK 4 - DAY 4 - Photographic Perspective

WEEK 4 - DAY 4 - Photographic Perspective

Today we are going to begin talking about photographic perspective. Click the following link to view examples of the following photographic perspectives.

  • Linear
  • Rectilinear
  • False Perspective
  • Vanishing Point Perspective
  • Height Perspective
  • Overlap Perspective
  • Dwindling Size 
  • Volume 
  • Atmospheric 
  • Birds Eye
  • Worms Eye
  • Forced Perspective

Photographic Perspective Blog

Tomorrow's photo shoot will be focusing on perspective.

ACTIVITY 1:

Create a slide show with 3 slides, 1 title, 1 descriptive slide and 1 sample, see example in shared folder.

Tuesday 21 April 2015

WEEK 4 - DAY 3 - MASKS and COOKIE CUTTER TOOLS

WEEK 4 - DAY 3 - MASKS and COOKIE CUTTER TOOLS

ACTIVITY 1: Modifying Backgrounds using Mask

STEP 1: Use yesterday's Week 4 - Photographic Angles - Modifying Backgrounds slide show.

STEP 2: Create 2 new slides and title for each slide 1. MASK - Smart Tool - Mask 2. MASK - Cookie Cutter

STEP 3: Follow the in class demonstration to create the results shown in WEEK 4 slide show example in the shared Photography folder.

Monday 20 April 2015

WEEK 4 - DAY 2 - ANGLES AND BACKGROUNDS

WEEK 4 - DAY 2 - ANGLES AND BACKGROUNDS

ACTIVITY 1: Modifying Backgrounds

STEP 1: Create a new Google Slide show, name it Week 4 - Photographic Angles - Modifying Backgrounds. Create a title slide and paste the 3 images from the photos you took of the class yesterday, one image per slide. You should have 4 slides.

STEP 2: The title for each image should reflect the Photoshop modification you will be making. 1. Soften Background - 2. Harden Background - 3. Blur Background


STEP 3: Open each of the images in Photoshop Elements - convert the background to a layer - duplicate the layer. You should have 2 layers per image.

STEP 4: On the top layer use the EFFECTS menu to create a soften affect to the layer.

STEP 5: With the top layer active, use the ERASER tool to erase the person in your image so that the bottom layer is showing through.

NEW SKILL: Eraser tool

STEP 6: Do a SAVE FOR WEB version of the image, then include it in your slide show along with the original image. See sample in shared photography folder.


STEP 7 etc.: Perform steps 4 to 6 for the remaining 2 images, one image should have a harden affect the other a blurred effect.

WEEK 4 - DAY 1 - Photo Shoot - Mood-emotion-angles

WEEK 4 - DAY 1 - Photo Shoot - Mood-Emotion-Angles

Today we will be visiting classrooms to take photos of students concentrating on their studies.

Once we arrive back at the classroom upload the images to your Google drive in your folder.

WEEK 3 - DAY 5 - Work Period

Work Period

Complete your 2 week 3 slide show and save to shared folder.

Thursday 16 April 2015

WEEK 3 - DAY 4 - Emotional Imagery

WEEK 3 - DAY 4  - Emotional Imagery

ACTIVITY 2:

STEP 1: In today’s saturated media world, photographs capture how our mind’s freeze a significant moment, we can make an emotional connection to an image. Go to the following site and select 3 images you feel tell a story, save the images on your hard drive.

http://www.smashingmagazine.com/2009/04/14/40-captivating-photos-that-depict-human-emotion/

STEP 1: Insert them in a new Google Slide show, name it Week 3 - Photo Emotion. Create a title slide and paste the 3 images, one image per slide, you selected in the slide show. You should have 4 slides.

STEP 2: The title for each image should reflect the emotion conveyed and a description of what you suspect the subject is thinking.


STEP 3: Open each of the images in Photoshop Elements and use the [CNTL] U and [CNTL] L to change the image to exaggerate some of the features of the image. 

STEP 4: Use the TEXT tool in Photoshop to include a description of image.


Wednesday 15 April 2015

WEEK 3 - DAY 3 - Power of the Image

ACTIVITY 1 - Photoshop Elements Modify LEVELS 

STEP 1 - SLIDE 5 (WEEK 3 Slide Show): Open one of the images you took during the rebirth photoshop, it should be an image with one major colour and muted background.

STEP 2 - Screen Snap: In Photoshop Elements press [CNTL] L to modify the images tonal levels. Take a screen snapshot of the Photoshop levels you changed. Paste the screen snap into the Slide 5 files.

STEP 3 Original Image: Include the original image in Slide 5 as well.


POWER OF IMAGES

The photo director for National Geographic, David Griffin speaks in this Ted Talk about the power of photography to connect us to our world. In a talk filled with glorious images, he talks about how we all use photos to tell our stories.

Click the following link to watch and listen to David Griffin’s photo essay of storytelling and connection.


Tuesday 14 April 2015

WEEK 3 - DAY 2 Tonal Photography

WEEK 3 - DAY 2 Tonal Photography

Refer to the handout in class or yesterday's blog post to continue the WEEK 3 Activity on Tonal Photography.

Monday 13 April 2015

WEEK 3 - DAY 1 - CONTRAST - LIGHT and SHADOW

WEEK 3 - DAY 1 - CONTRAST - LIGHT and SHADOW


Removing colour from a photograph or shooting a black and white can give the photograph the following affects:
-          Allow the eye to “read” black and white
-          Add drama and impact to a composition
-          Give a sense of timelessness
-          Simply the subject

Contrast in photographic composition focuses the viewer's attention to the center of interest. Positioning of subject elements to create contrast gives them added emphasis and directs the viewer's attention.

TONAL CONTRAST:
In black-and-white photography, contrast is the difference in subject tones from white-to-gray-to-black or from the lightest tone to the darkest tone. In color photography different colors can create contrast, that is another lesson.
HIGH and LOW CONTRAST: In black-and-white photography, high contrast (few mid-tones) conveys a hard edge and delivers a more severe message. Low contrast (mostly mid-tones) conveys a softer and gentler message.

Activity 1 WEEK 3 SLIDE SHOW: (see AWQ4M folder for sample)
Using 3 photographs you took on the Friday re-birth photoshoot. Focus on images with high tonal contrast. Include 1 image of tonal photography from the Internet.

STEP 1: Create a slide show and rename it WEEK 3 – TONE and CONTRAST. Create the Title slide with a tonal image you downloaded from the Internet.

STEP 2: Open the 3 images you selected from Friday’s photoshoot. Open them in Photoshop Elements.

STEP 3: IMAGE 1 - ADJUST COLOUR HIGH CONTRAST – Press [CNTL] U to adjust the HUE – SATURATION – LIGHTNESS  of your image until you have a high contrast photograph. Take a screen snapshot of the HUE Photoshop levels you changed. 
SKILL 1: Use Photoshop’s colour adjustment – CNTL U

STEP 4: SLIDE 2- Paste your HUE/SATURATION window snapshot into SLIDE 2 of your Week 3 slideshow. Make sure your snapshot includes the modified image. Insert the original image on the slide as well.

STEP 5: IMAGE 2 - ADJUST COLOUR LOW CONTRAST – Press [CNTL] U to adjust the HUE – SATURATION – LIGHTNESS  of your image until you have a low contrast photograph. Take a screen snapshot of the HUE Photoshop levels you changed.

STEP 6: SLIDE 3 - Paste your HUE/SATURATION window snapshot into SLIDE 3 of your Week 3 slideshow. Make sure your snapshot includes the modified image. Insert the original image on the slide as well.

STEP 7: IMAGE 3 - USE EFFECTS Panel to the right top of the page to create a high contrast image.

SKILL 2: Use “Effects” panel to modify image. Save image under a different name and put both images in SLIDE .

STEP 8: SLIDE 4 - Paste your USE EFFECTS modified image into slide 4, also include original image.

Friday 10 April 2015

WEEK 2 - DAY 4

WEEK 2 - DAY 4

Field Trip Location: Theater Aquarius meet at the Fertility Sculpture, then down Ferguson Street

Content Theme: Rebirth

Photographic Theme: Light and Shadow - High Contrast Subject


Wednesday 8 April 2015

WEEK 2 - DAY 3 Colour

COLOUR CONTINUED... Describing Colors
HSB
Even though we can see colors accurately, it is very difficult to describe them without a reference point to relate them to. That is what color measurement is designed to do


To accurately describe colors for color matching, especially when we delve into the world of digital imaging and color management, we need a more reliable method. In order to describe a specific color, we need to break it down into three elements:

Hue is the actual color. It is measured in angular degrees counter-clockwise around the cone starting and ending at red = 0 or 360 (so yellow = 60, green = 120, etc.).
Saturation is the purity of the color, measured in percent from the center of the cone (0) to the surface (100). At 0% saturation, hue is meaningless.
Brightness is measured in percent from black (0) to white (100). At 0% brightness, both hue and saturation are meaningless.
By using these three measurements, any color can be described so that it can then be recreated accurately throughout an imaging system. An understanding of these measurements will help you to understand the relationships between the colors in the scene that you are photographing and how these will be reproduced in the final image.

RBG
This is the scheme that you will use most often when you are dealing with colors on a computer monitor—in graphics packages, in programming, or in Web pages. RGB describes colored light which is viewed coming from its source (colored light bulbs in a theater, the colors of a video display, or reflection from a white object). It is called an additive color system, since you add light from the primary colors to make new colors.
The values for red, green, and blue commonly use a scale or measurement from 0–255. All modern video cards, which are capable of 16M colors, use one byte each (per pixel) for the R, G, and B values, so the 0–255, higher numbers mean more of each color of light. 


ACTIVITY 1

STEP 1: Using the photographs you took on your Hamilton Market field trip, select 3 images, each image should:
- feature one main chromatic colour
- establish the rate of saturation in the colour, i.e. how much black, gray or white is in the mix
- establish the colour luminance, i.e. how much light is emitted from the colour 
- establish the RGB values from 0 to 255

STEP 2: GET COLOUR VALUES: You will do this by opening your image in Photoshop Element and using the eyedropper tool to get a colour read. 
SKILL 1: OPEN PHOTOSHOP FILE: Select Photoshop Elements option from the START menu, use the EDIT option to open a image.
SKILL 2: PHOTOSHOP EYE DROPPER TOOL: One the left hand side of the Photopshop workspace, you will a tool bar,
SKILL 3: SCREEN SNAPSHOT: You can take a snaphot of the Photoshop colour chart, you can do this by [Alt] + [PrtSc] then paste into your slide show.
SKILL 4: CROP TOOL in GOOGLE SLIDES: You will need to use the CROP tool in Google Slides as well to remove parts of your screen snapshot.


STEP 3: Using the WEEK 2 Google slide show you created yesterday add 3 new pages. On each page include the image you selected with the RGB and HSB colour features described, feel free to use your screen snapshots to do this.

WEEK 2 - DAY 2 - Colour and Light

WEEK 2 - DAY 2 - Colour and Light

Light


Much of our knowledge about light derives from experiments that the scientist Sir Isaac Newton (1643–1727) carried out in the 17th century.

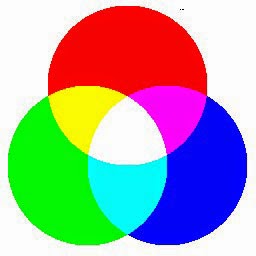
He demonstrated that daylight can be split into a series of colors. This sequence of colors—red, orange, yellow, green, blue, indigo, and violet—is known as the chromatic color sequence. Colors that are not part of this sequence, such as beige or burgundy, are known as nonchromatic colors.

CHROMATIC COLOUR SEQUENCE: ROYGBIV

Why Objects Appear  Colored
When we see an object lit by white light, its color is due to the object absorbing some colors and reflecting (or transmitting) others. For example, green foliage appears to be green because it contains pigments that absorb blue and red light and reflect only green light. It is a similar story when the light is viewed through an object, such as a photographic filter. You only see the part of the spectrum that is allowed through. For example, a blue filter blocks red and green light, and allows only the blue part of the spectrum through.

Measuring Colors


Human vision is very good at recognizing the differences between two colors seen side by side. However, it is a different story when it comes to accurately describing individual colors to someone else.

While our eyes cannot see ultraviolet or infrared radiation, these can have an effect on the image produced by both digital sensors and film. In most circumstances, it is undesirable for the image to register radiation outside of the visible spectrum.


The nature of light itself is still the subject of much speculation. Current theories explain light by giving it the properties of both waves and particles. We will deal primarily with the wave theory; this explains the aspects of light, such as wavelength and frequency, that concern us in color photography.
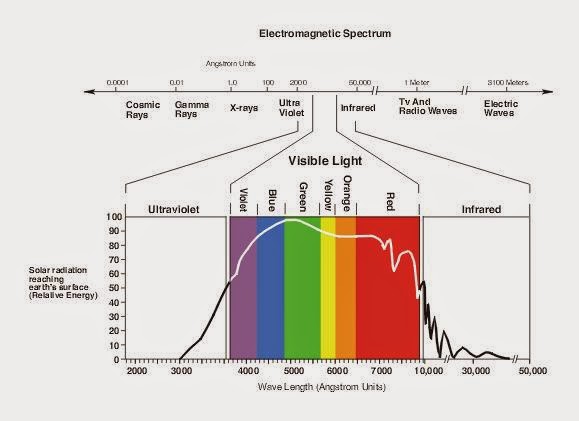
Light Waves

Light waves are the visible part of a much larger group of waves known as the electromagnetic spectrum, which includes X-rays and radio waves. The  range that is present in daylight is shown below. This ranges from the short-wavelength ultraviolet to the longer-wavelength infrared, with the visible portion in between.


ACTIVITY 1

STEP 1: Using the crystal and a light source take at least 3 images of the chromatic colour, i.e rainbow that you get when you sign a flashlight into the crystal.

STEP 2: Create a Google slide show titled WEEK 2 - Colour, and create your first slide with the image you took of the chroma colour light split and a description of the image. 

SUGGESTION: Access the you tube video using "mandelbrot set" as a search to show light images, you can take images of the screen as a substitution for the crystal images. 

Tuesday 7 April 2015

WEEK 2 - DAY 1 - Creative Process Summary


WEEK 1 - REVIEW


ACTIVITY 1

Using the Google slide file you created last week in your school email Google drive account, add the following slides:
SLIDE 1:
Title - Workings of the Brain    
Content - Answers from the "Jill Bolte Taylor" Ted Talk
Image - One of the brain image's from the AWQ4M folder
SLIDE 2:
Title - What Can Creativity Do
Content - Include 5 items from the list of 13 that were covered in the OCAD short film
Image - Search the Internet for at least 2 images that you think are visually representative of the 5 items you selected.

SLIDE 3:
Title - WHAT DO I THINK?
Content - Include at least 2 comments on what you thought of the subject matter last week.
Image - include at least 1 image that visually represents your thoughts, search the Internet for an appropriate image.

HAND IN: Once complete drag your slide into the folder you shared with me. I will check to make certain I can see it in my shared folder. 

Thursday 2 April 2015

WEEK 1 - DAY 4 - Field Trip

WEEK 1 - DAY 4 - Field Trip

FIELD TRIP - The subject focus for today's field trip is Easter. The photographic focus for today's field trip is colour.

PHOTOS - You will be taking at least 5 good quality photos you can use in next weeks lessons and assignments on colour.

Tuesday 31 March 2015

WEEK 1 - DAY 3 - CREATIVE PROCESS


WEEK 1 – DAY 3 – CREATIVE PROCESS


CREATIVE PROCESS: Creativity can be a difficult thing to define. There is no denying it. Part of the reason is that it is easier to learn not to be creative than it is to learn how to be creative. Creativity like anything else is learned – it is NOT a case of either “you have it or you don’t”. You can have it, if you want it.

Part of the challenge is that how people are creative is individual. Everyone is creative in different ways, and use different processes for developing and exploring and making their ideas happen. The following presentations will explain the key characteristics of creativity that will be developed as you move from grade 9 through grade 12, and how you can demonstrate your creative process.


In the following video produced by the Ontario College of Art and Design (OCAD), students have investigated what creativity is capable of, and what it can do. As you watch the video, don’t just focus on the end product, but think about the steps, the stages, the process of developing what we see in this video. The creative process is a strategy that someone uses for moving from a problem to an idea to a solution.


PROBLEM      ->    IDEA    ->    SOLUTION


ACTIVITY 1: Watch video on Creativity


List the 15 points made in this short video on what creativity can do:

1
2
3
4
5
6
7
8
9
10
11
12
13
14
15


ACTIVITY 2: Access Google Slides

1.       Access the home.hwdsb.on.ca web site and access your OFFICE 365 Mail

2.       Make certain you have received an email from your instructor indicating that the AWQ4M course folder has been shared with you.

3.       Go back to the main home page and access the GOOGLE Apps and access GOOGLE SLIDES as per instruction sheet.

4.        Follow in class instructions on creating a slide presentation on the creative process.

Monday 30 March 2015

WEEK 1 - DAY 2 - CREATIVE PROCESS and BRAIN FUNCTION


WEEK 1 - DAY 2 -  CREATIVE PROCESS and BRAIN FUNCTION


This Ted Talk video describes how the left and right brain functions. The talk is given by a Harvard brain scientist who experienced a stroke in the prime of her life and learned, first hand, what happens when your left brain shuts down.


ACTIVITY 1.1 Answer the following questions:


1.       Summarize the normal functioning of the left and the right brain, what side of the brain is responsible for what functions.

LEFT:


RIGHT:


2.       She explains experiencing “Nirvana” when her left brain was no longer functioning. How does she explain experiencing Nirvana.

in the Right Hemisphere

In the Left Hemisphere


3.       Explain in your own words what side of the brain would be most active during the creative process and explain why.


ACTIVITY 1.2


Make certain you can log onto the home.hwdsb.on.ca site and access the GOOGLE APPS tab. Download Google Drive on your phone and Google Slides(Presentation).

PREVIOUS KNOWLEDGE: Will need to do a screen capture with your phone or laptop [Alt] + [PrtSc]

Wednesday 25 March 2015

WEEK 1 - DAY 1 - Course Overview

WEEK 1 - DAY 1


Course Title: Visual Arts – Digital Photography

Course Code: AWQ3M
Credit Value: 1.00
Teacher: Jill Charbonneau

Date: March 2015 – June 2015

Course Description: This course introduces students to the principles of digital photography through the exploration of the creative process and the elements and principles that government photo composition, colour theory and elements of design.

Course BLOG:  hwdsbdigital.blogspot.ca

Course Outline: The following units will be covered in this course:
• Digital Course Basics – Google Drive, Google Docs
• Examining the Creative Process through Left and Right Brain Function
• Capturing light using digital tools
• Digital Image Overload – A Picture Paints a Thousand Words
• Elements of Design
• Colour Model – Hue, Value, Chroma
• Light spectrum, human vs digital eye
• Light Value, light vs. dark
• Basic Photographic Composition
• PEOPLE: Self Portrait – Examining the digital selfie
• PEOPLE: Self Portrait – the 4 division of self
• Perspective - Line of Sight
• OBJECTS: Staging an Image – foreground, mid-ground, background
• OBJECTS: Undisturbed still life
• Images of Social Media – Disposable or Treasures
• MOVING OBJECTS: Capturing objects in motion

Course Evaluation: Ongoing Assessment and Evaluation during semester, including tests, lab work, assignments, quizzes, homework, and projects
 25% Knowledge and Understanding (knowledge of facts and terms, understanding concepts, principles, and relationships between concepts)
 15% Thinking and Inquiry (critical, inquiry, and creative thinking skills)
 10% Communication (communication of information and ideas in various forms)
 25% Application (application of concepts, skills, and procedures, use of equipment, technology)
 25% Portfolio / Project

Class format: A daily lesson will be presented and time given to research new information introduced in class, most projects will be completed in class.

A mind that is stretched by new experiences can never go back to its old dimensions (Oliver Wendell Homes Jr.)
 
ACTIVITY 1: Using the handout provided, sign into the HWDSB hub and click the Google Apps option. Make certain you can log in.
 
ACTIVITY 2
 
Watch this TED talk speaker, Erik Johansson talk about his photographic composition techniques.


Simple Photo
Locate subject - Press a Button – Take a Photo
 
   ▲ ▲ ▲    
light        contrast
 
               ▲ ▲ ▲ ▲ ▲ ▲           
colour     brightness     perspective
Complex Photo
  ▲ ▲ ▲ ▲ ▲ ▲ ▲ ▲ ▲ ▲
composition    capturing an idea vs a moment
Combined Reality Photos
            ▲ ▲ ▲ ▲ ▲ ▲ ▲ ▲ ▲ ▲▲ ▲ ▲            
Build an image from various images

Answer the following questions:
 
1. What are your first impressions of Erik's photos?
 
2. How does he describe the process he uses to create an image?
 
3. Where do you think Erik draws his inspiration from when he takes his images?
 
Answer these questions in your note book.